There are three ways to add a popup to WordPress: install the free plugin from the WordPress plugin directory, paste one script line into your theme, or ship that same line through Google Tag Manager. Each takes under ten minutes, and none of them requires writing code.
The route you pick matters less than what most guides skip: the popup should not slow your site down, and on a content site it has to behave differently than it would on a store — a blog earns its signups mid-article, not on arrival. This guide covers the three installs step by step, the speed question honestly, and a complete newsletter popup you can copy, rules and all.
Key Takeaways
- The plugin is the easiest route — install ChilliPopup from wordpress.org, paste your Workspace ID, done. No theme edits, and it survives theme changes.
- All three routes load the same async script, so the popup is managed from a dashboard — you never redeploy WordPress to change a headline.
- Async means no render blocking: the browser never pauses your page to wait for the popup script, so readers see your content at full speed.
- Blogs convert on engagement triggers — 50% scroll and time-on-page beat show-on-arrival, and exit intent catches desktop readers on the way out.
- Target by URL, cap the frequency. A recipe popup on
/category/recipes/shown once a week converts; the same popup on every page view gets your site resented.
The three ways to add a popup to WordPress
Whatever the route, the architecture is the same: a small script loads on your pages, checks which campaigns are published for your site, and renders them according to their display rules. The three methods only differ in how that script gets onto the page — so you can switch between them later without rebuilding anything.
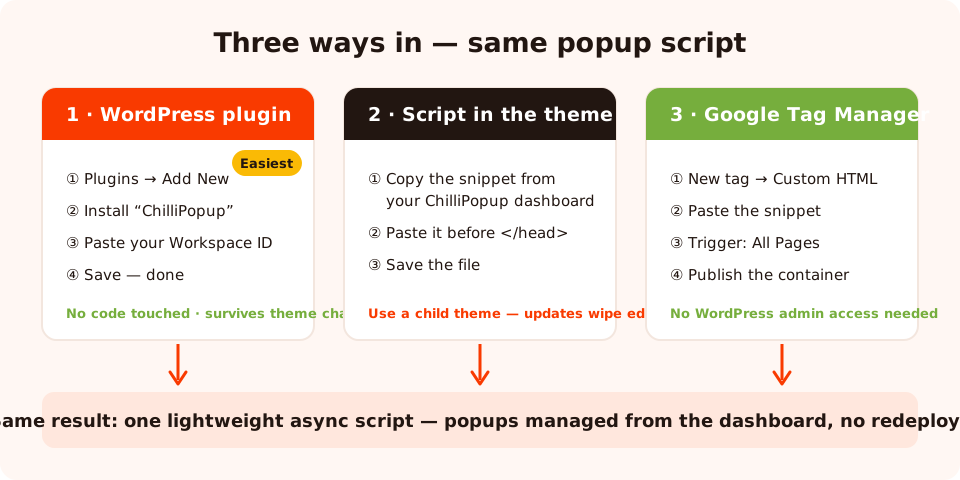
Plugin, theme script or Tag Manager — three doors into the same room.
| Method | Best for | Time | Survives a theme change? | Watch out for |
|---|---|---|---|---|
| WordPress plugin | Almost everyone — bloggers, site owners, anyone with wp-admin access | ~5 min | Yes | Nothing much — it's one settings field |
| Script in the theme | Sites that keep plugin count minimal, or headless/customised setups | ~5 min | No — re-paste after switching themes | Theme updates can wipe manual edits; use a child theme |
| Google Tag Manager | Teams that already manage every tag in GTM, or marketers without wp-admin access | ~10 min | Yes (GTM container stays) | Loads after GTM itself; blocked wholesale by anything that blocks GTM |
Method 1: the WordPress popup plugin (easiest)
The ChilliPopup plugin is free and listed in the official WordPress plugin directory. It does exactly one thing: it adds the popup script to every page of your site, tied to your account. That thinness is a feature — no bundle of CSS and JavaScript riding along, nothing to keep patched beyond a one-field plugin.
- In wp-admin, go to Plugins → Add New and search for ChilliPopup.
- Click Install Now, then Activate.
- Create a free ChilliPopup account and copy the Workspace ID from the dashboard's install screen.
- Paste it into the plugin's settings page in WordPress and save.
That's the entire integration. From here on, everything — building popups, changing copy, pausing a campaign — happens in the ChilliPopup dashboard and goes live immediately; you never touch WordPress again to edit a popup. The step-by-step with screenshots is in the WordPress install guide.
Why this beats pasting code for most people: the plugin survives theme switches and theme updates, it can't be broken by a typo, and removing it is one click.
Method 2: paste the script in your theme
Prefer zero extra plugins? The dashboard's install screen gives you a single script line for your
site's <head>. Copy yours from the dashboard rather than retyping — it already
contains your ID:
<!-- ChilliPopup — one async line, place before </head> -->
<script async src="https://player.chillipopup.com/javascript/pixel.js?id=YOUR-WORKSPACE-ID"></script>
Where to paste it, from safest to least safe:
- Your theme's custom-code box. Many themes ship a "header scripts" or "custom code" field in the customizer — paste there and it survives updates.
- A child theme's
header.php, just before</head>. The child theme protects your edit when the parent theme updates. - The parent theme's
header.phpdirectly — works, but the next theme update silently deletes your line. Avoid unless it's a theme you maintain yourself.
This is the same universal snippet that works on any site, WordPress or not — the any-website install guide covers it in full.
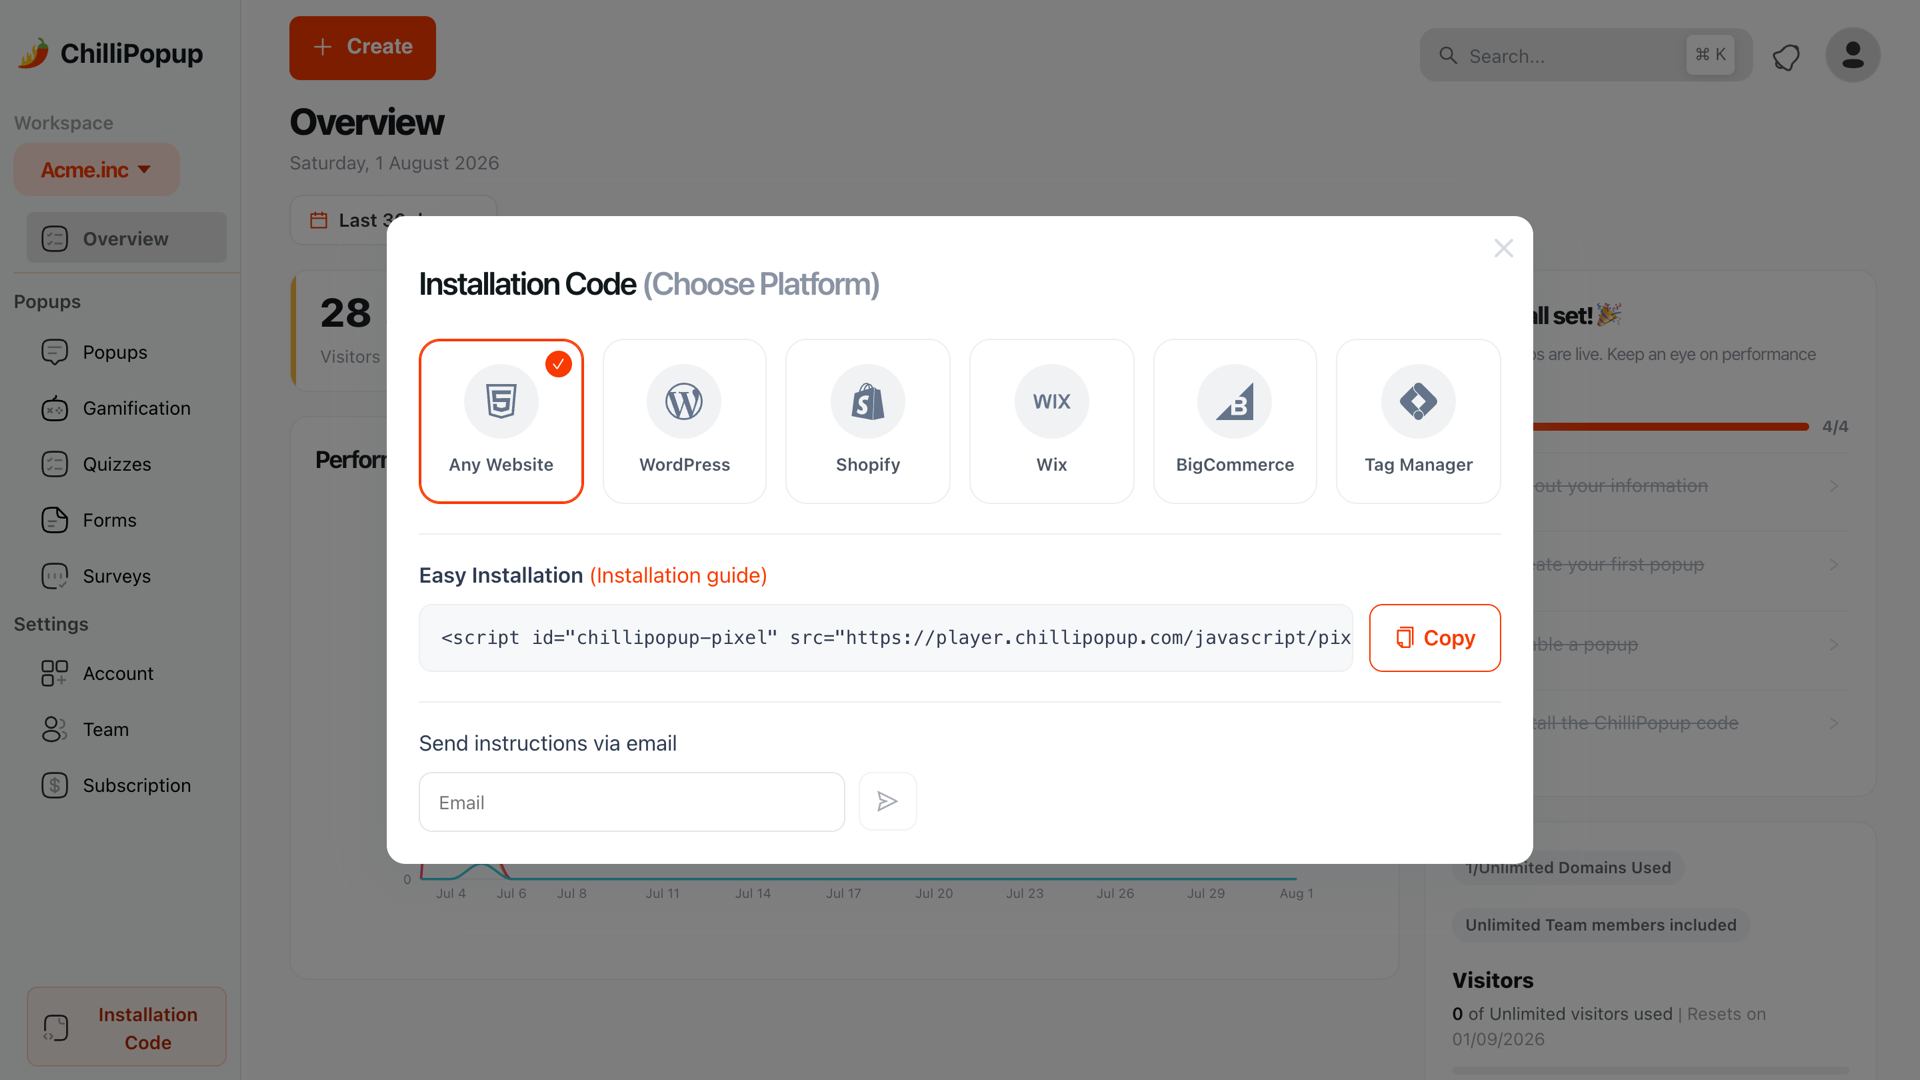
The install screen generates your exact snippet — copy it from here, never retype it.
Method 3: Google Tag Manager
If your site already runs Google Tag Manager, deploy the popup script like any other tag — useful when the person running campaigns has no wp-admin access, or when policy says every third-party script goes through the container.
- In GTM, create a New Tag → Custom HTML.
- Paste the install snippet from your ChilliPopup dashboard into the HTML field.
- Set the trigger to All Pages.
- Preview, then Publish the container.
Two honest trade-offs: the popup script can only start loading after GTM itself has loaded, so it appears a beat later than the direct routes; and anything that blocks Tag Manager blocks everything inside it, popup included. If GTM is your standard, follow the Tag Manager install guide; if not, the plugin is the better default.
Pick one route, not two. If the plugin is active and the script is in GTM, the script loads twice and your popups can double-fire. Before installing by a second method, remove the first.
Will a popup slow down your WordPress site?
This is the question that stops most bloggers, and whether a popup costs you page speed depends entirely on how its code arrives.
Popups built into a heavy theme or assembled inside a page builder typically ship their CSS and JavaScript as part of the page itself. Every visitor downloads that weight on every page, whether a popup ever fires or not — and anything loaded synchronously in the head pauses rendering until it's fetched and parsed. That's the "my popup tanked my scores" story, and it's an architecture problem, not a popup problem.
A hosted script flips the model. ChilliPopup renders through one lightweight script that loads asynchronously: the browser starts fetching it and immediately carries on building your page, so your content renders at full speed in parallel. There's no iframe embedded in your page either — the popup renders directly into it.
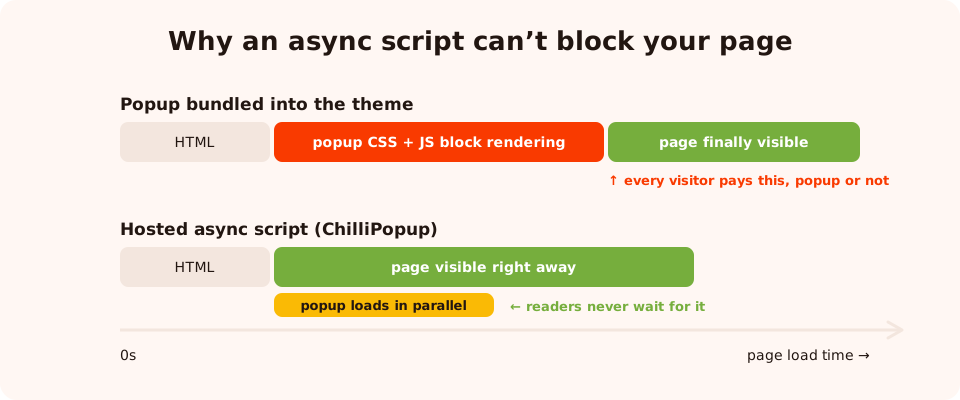
Async loading in one picture: the page never waits for the popup.
Three properties answer the follow-up questions too:
- No render blocking. An
asyncscript is explicitly non-blocking — a slow network delays the popup, never your content. - No layout shift. A popup draws on top of the page, so it doesn't push your paragraphs around the way an injected inline banner can.
- No WordPress-side weight. Popup designs live on ChilliPopup's side and are fetched by the script — your theme, database and page HTML stay exactly as they were.
Which popup types fit a blog or content site
Store popups push discounts. Content-site popups trade value for attention — four formats are worth building first:
The email list popup
The workhorse. One headline, one email field, one button, triggered mid-read when the post has proven its worth. If you build only one popup, build this — it's the worked example later in this guide.
The exit intent popup
Fires when the cursor heads for the tab bar — the reader was leaving anyway, so the interruption costs nothing. On a blog it's the natural second campaign: a last offer of the newsletter, or a pointer to your best related post. One caveat: exit intent reads mouse movement, so it's a desktop behaviour — give mobile readers a scroll-triggered popup instead.
The inline form
Not every ask should interrupt. A form is the quieter twin of a popup — same builder, same fields, same targeting — for the moments a modal feels too loud: a footer signup, a "request the checklist" box after a tutorial, a contact form on your about page.
The blog-to-newsletter bridge
The most underrated pattern on content sites: a popup that offers more of exactly what the reader is consuming. On recipe posts it offers a weekly recipe; on finance posts, the monthly breakdown. Same template, duplicated per category, each with its own URL targeting and headline — specific beats generic, and page targeting makes specific cheap.
Display rules that matter on a blog
Installing the script puts you on the field; display rules decide whether you play well. Four do most of the work on a content site:
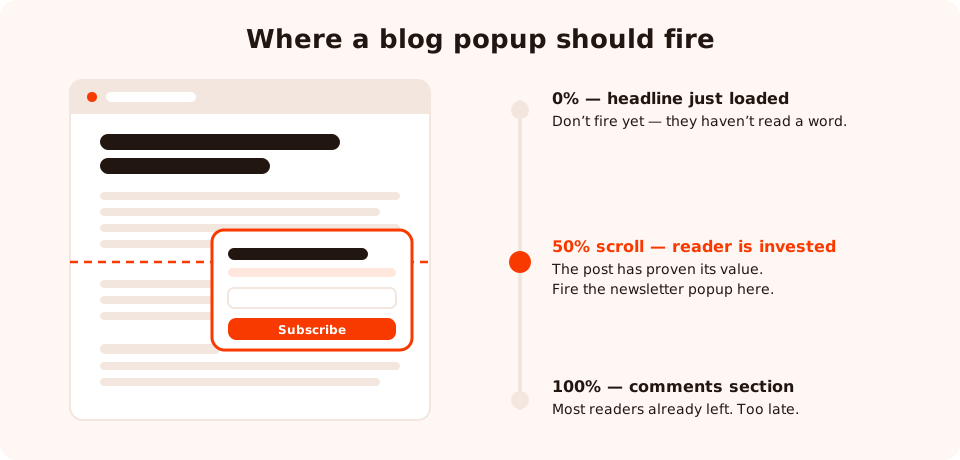
Scroll depth is a proxy for trust: at 50% the reader has decided your content is worth their time.
- Scroll percentage. Fire at around 50% of the page. A reader halfway through your article has received value — that's when "want more of this?" stops being an interruption and starts being an offer. Firing on arrival asks a stranger for their email before saying hello.
- Time on page. The alternative engagement trigger: a 30–60 second delay says "they're actually reading". Use scroll for long posts, a time delay for short ones — the popup shows as soon as the first enabled trigger fires.
- Page targeting per category. Rules like URL contains
/category/recipes/or URL starts with/reviews/let each category run its own pitch. If your category or a consistent slug prefix is in the permalink, you can target it. - Frequency for returning visitors. Blogs live on repeat readers — exactly who a naive popup burns. Show once every 7 days or once every few visits, and turn off "show again after conversion" so subscribers never see the signup ask again.
Rules stack as AND conditions, so combine them: 50% scroll + URL contains /category/recipes/ + once every 7 days + never after conversion surfaces at most once a week, mid-read, to unconverted recipe readers only — a popup nobody writes an angry tweet about. Device targeting layers on top when you want a desktop exit-intent campaign and a separate mobile scroll campaign.
Worked example: a newsletter popup for a recipe blog
A complete build you can adapt line for line — a fictional food blog turning recipe readers into newsletter subscribers.
Start from a template
In the dashboard, open the popup template gallery and pick a simple newsletter layout — image, headline, one field, one button.
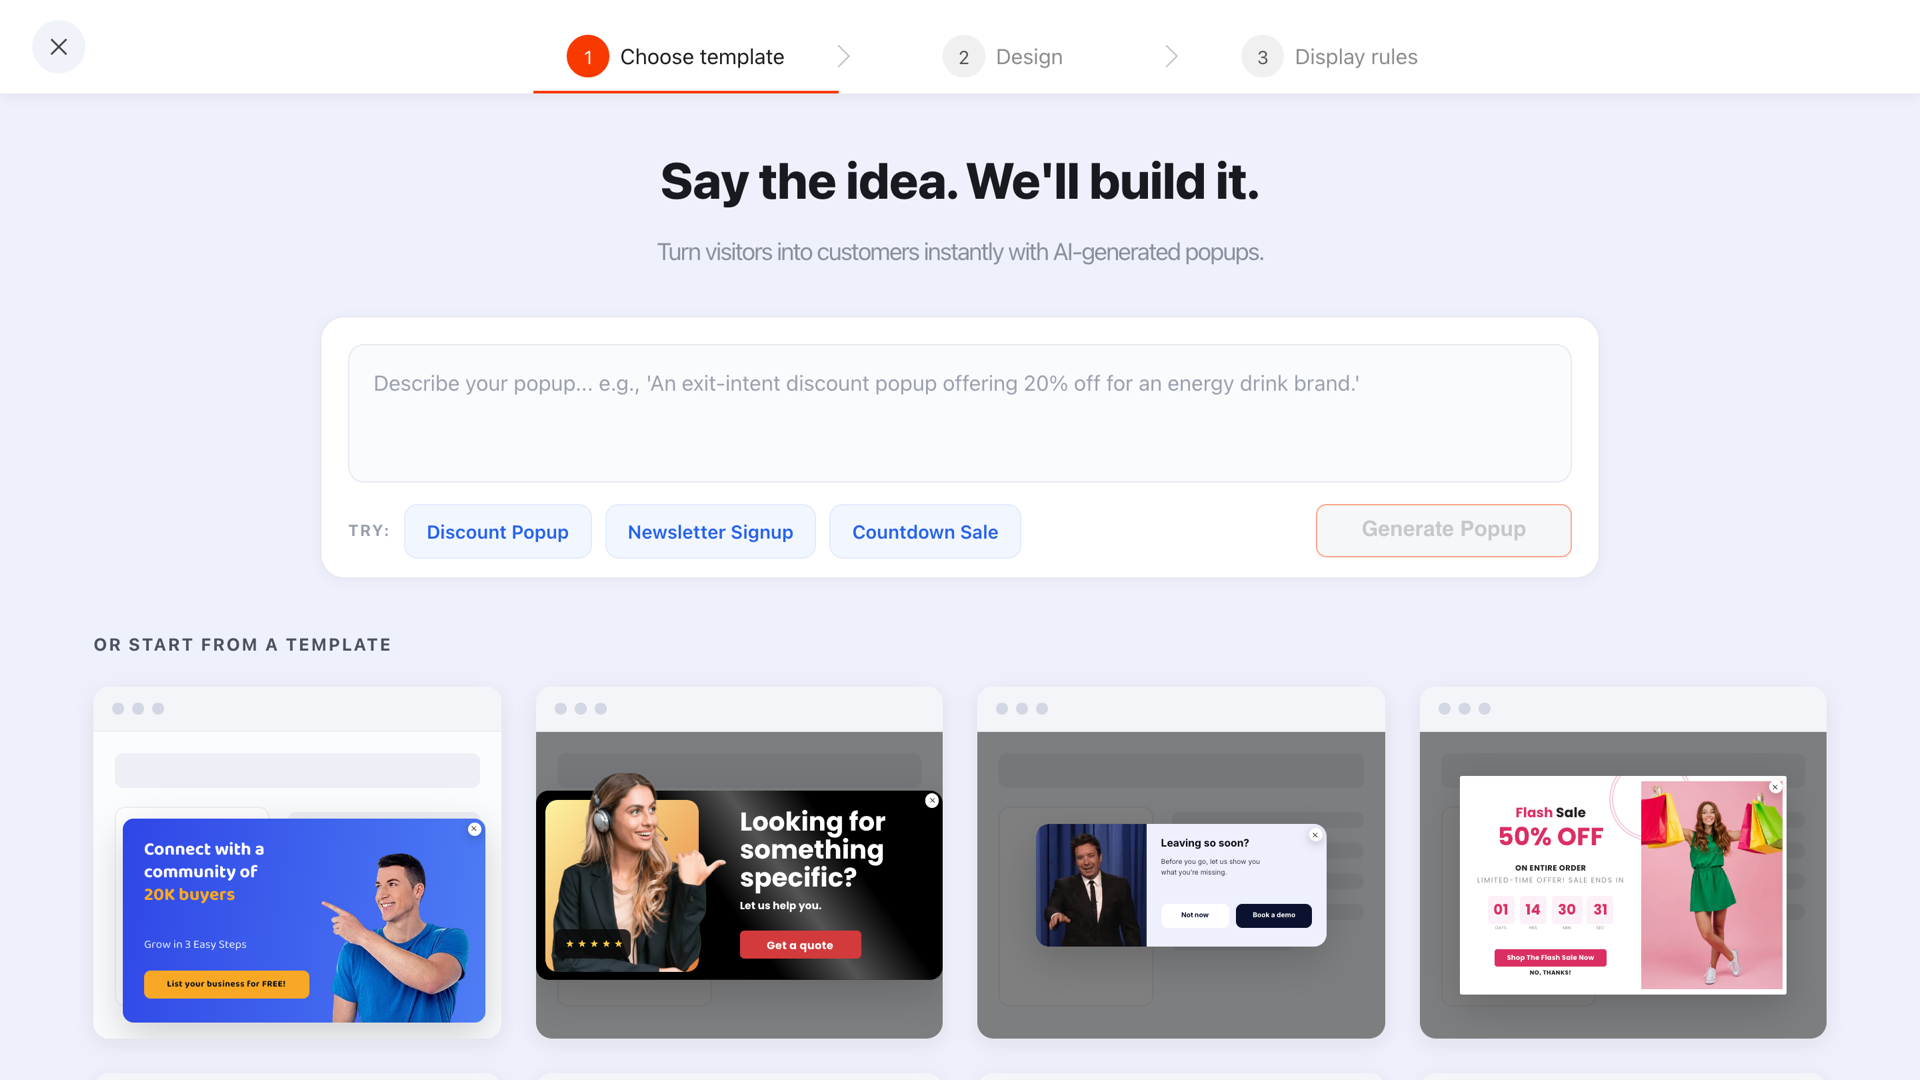
Start from a newsletter template and edit the words; don't start from a blank canvas.
The copy
- Headline: "One tested dinner recipe, every Friday"
- Body line: "No spam, no life story before the ingredients — just next week's best dinner, in your inbox."
- Field: a single email input, placeholder "you@example.com"
- Button: "Send me Friday's recipe"
- Decline link: "No thanks, I'll keep scrolling"
Notice what the copy does: it names the exact thing subscribers get ("one tested dinner recipe"), the exact schedule ("every Friday"), and it disarms the two standard objections (spam, rambling preamble). The button repeats the reward instead of saying "Subscribe", and the visible decline link matters: readers who can leave politely don't punish you for asking.
The rules
- Trigger: page scroll, 50%
- Page targeting: URL contains
/category/recipes/ - Frequency: once every 7 days
- After conversion: off — subscribers never see it again
- Devices: all; if you later add a desktop exit-intent variant, restrict this one to mobile

Everything in the example — headline, field, button, decline link — is a block you drag and edit.
Publish and verify
Publish the campaign, open a recipe post in a private window (so yesterday's testing doesn't suppress it), scroll halfway, and watch it appear. Submit a test email and confirm it shows up in your dashboard. Total build time: about twenty minutes, most of it on the headline — the right place to spend it.
Six common WordPress popup mistakes
- Installing the script twice. Plugin + GTM, or plugin + pasted snippet, loads everything twice and can double-fire your popups. One route only.
- Firing on arrival. A popup at zero seconds converts strangers at stranger rates and trains regulars to close it reflexively. Trigger mid-read, when the value exchange makes sense.
- No frequency cap. Showing the same popup on every page view is the fastest way to make loyal readers resent you. Once every few days is plenty.
- Leaving "show after conversion" on. Your most engaged people — existing subscribers — get nagged with an ask they already said yes to.
- Full-screen takeovers on mobile. Search engines penalise intrusive mobile interstitials on content pages, and readers hate them anyway. Keep mobile popups modest in size, easy to dismiss, and scroll-triggered.
- A generic pitch on specific pages. "Subscribe to our newsletter" under a post found by searching "how to sharpen a knife" wastes your targeting. Duplicate the campaign per category and make each headline about that category.
Measuring whether your WordPress popup works
Every campaign reports its own views, clicks, submissions and conversion rate in the analytics dashboard — no extra tracking plugin, no spreadsheet.
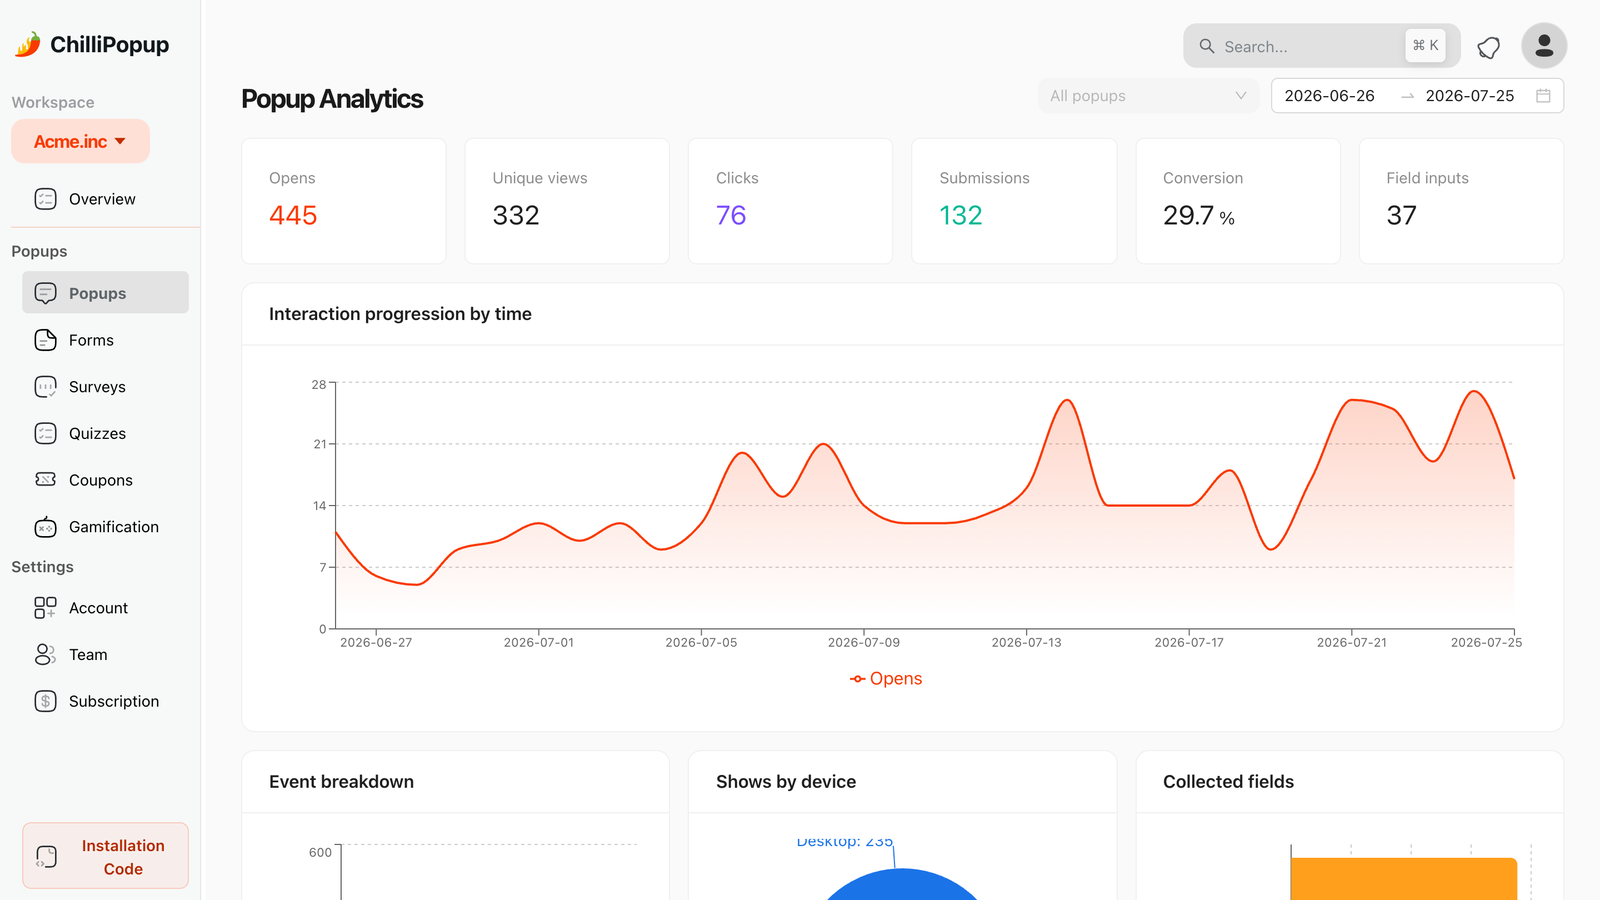
Views, submissions and conversion rate per campaign — the three numbers that settle every popup argument.
Read them in this order:
- Views first. Low views mean a rules problem, not a copy problem — targeting too narrow, scroll threshold too deep, or frequency cap too strict. No headline rewrite fixes a popup nobody sees.
- Conversion rate second. Submissions divided by views: of the people who saw it, how many signed up? This is the number your copy and offer control.
- Trend third. Compare a campaign against itself over time, and against your other campaigns — the recipe popup versus the reviews popup tells you which pitch earns its slot.
- Change one thing at a time. When you want certainty, run an A/B test — built-in traffic splitting between two variants, so the headline duel is settled by data instead of taste.
Give any change two weeks before judging it — blog traffic swings by weekday and by which post happens to rank, so a three-day verdict mostly measures noise.
The 20-minute setup, start to finish
Everything above, compressed into one runnable checklist:
1. Install the plugin
Plugins → Add New, search "ChilliPopup", install and activate. (Or use the theme script / Tag Manager route — one of the three, never two.)
2. Connect your Workspace ID
Create a free account, copy the Workspace ID from the dashboard's install screen, paste it into the plugin settings, save.
3. Build the popup from a template
Pick a newsletter template and rewrite the four lines that matter: headline, body, button, decline link.
4. Set the rules
50% scroll, URL targeting for the posts it belongs on, frequency capped at once every few days, "show again after conversion" off.
5. Publish and verify
Open a targeted post in a private window, scroll halfway, watch it fire. Submit a test email and check it lands in the dashboard.
6. Read the numbers in two weeks
Views tell you if the rules work; conversion rate tells you if the copy works. Fix whichever is weakest, one change at a time.
Put a popup on your WordPress site today
Install the free plugin, paste one ID, and build your first newsletter popup from a template — popups, forms, surveys, quizzes and games, all from one editor. Free plan, no credit card required. Paid plans from $29/month.
Start free →Related reading
Frequently asked questions
What is the easiest way to add a popup to WordPress?
Install the free ChilliPopup plugin from the WordPress plugin directory, activate it, and paste your Workspace ID from the ChilliPopup dashboard into the plugin's settings. That is the whole install — you build and edit the popups themselves in the dashboard, and they appear on your site without touching any theme code.
Do I need to know how to code to add a popup to WordPress?
No. The plugin route involves no code at all, and even the manual route is a single copy-paste — one script line into your theme's header, or the same line inside a Google Tag Manager tag. The popup itself is built in a drag-and-drop editor, and changing it later never touches WordPress again.
Will a popup slow down my WordPress site?
Not if it loads the right way. ChilliPopup renders through one lightweight script that loads asynchronously, so the browser never pauses your page to wait for it — readers see your content at full speed whether or not a popup ever fires. Popups baked into heavy theme or page-builder bundles are a different story: their CSS and JavaScript load on every page, for every visitor, popup or not.
How do I add an exit intent popup to WordPress?
Install ChilliPopup using any of the three methods in this guide, then build a popup and pick exit intent as its trigger in the display rules. It fires when the visitor's cursor moves to leave the page. Exit intent relies on cursor movement, so it is a desktop behaviour — pair it with a scroll-percentage trigger for mobile readers.
Can I show a popup only on certain WordPress posts or categories?
Yes — with page targeting by URL. Add a rule like "URL contains /category/recipes/" or "URL starts with /reviews/" and the popup only appears on matching pages. Because the rules match URL patterns, a consistent permalink structure — category in the path, or a shared slug prefix — makes per-topic targeting easy.
Does a WordPress email popup send the emails too?
No — and that separation is deliberate. ChilliPopup collects the signups and stores every submission in your dashboard; you then send the newsletter from your own email tool. That means you can switch email providers at any time without rebuilding your popup, and redesign your popup without touching your email tool.