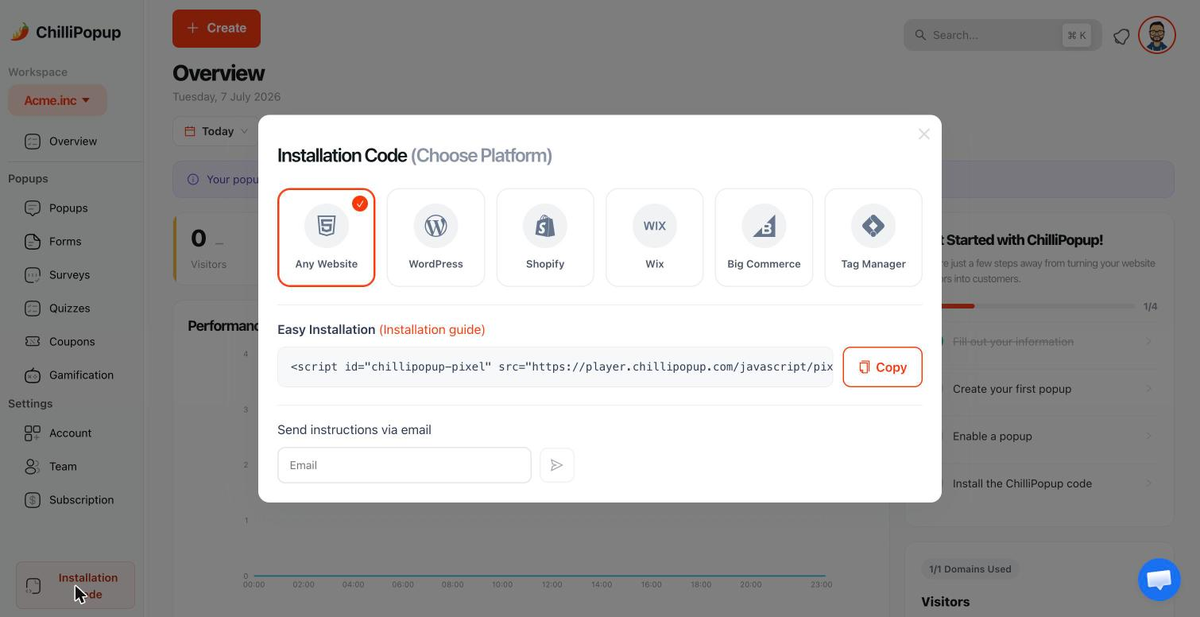
ChilliPopup lets you build popups, forms, surveys and quizzes in a drag-and-drop editor. To make them appear on your site, the browser needs to load one small script — the ChilliPopup pixel. This guide walks you through installing it on any website, whatever it is built with, in about two minutes.
If your site runs on a platform we support directly, you can skip the code entirely — jump to the no-code shortcuts for WordPress, Shopify and Google Tag Manager.
Key Takeaways
- One line of code, once. A single snippet loads all of your published content — you never re-install when you add a new popup.
- It goes in the
<head>. Paste it just before</head>on every page you want popups to show on. - Loads asynchronously. The pixel never blocks your page from rendering and never breaks your site.
- Only Published content appears. Drafts are never served, so nothing shows until you hit Publish.
- No developer needed. Copy, paste, publish — and there are one-click plugins for WordPress, Shopify, Wix and Google Tag Manager.
What the ChilliPopup install code does
When a visitor lands on your site, their browser loads the ChilliPopup pixel. The pixel checks which of your popups, forms, surveys and quizzes are published and enabled for that workspace, reads their display rules (when and where to show), and renders the right one at the right moment — directly into your page, with no iframe.
The snippet looks like this. Your real one already has your Workspace ID filled in:
<script id="chillipopup-pixel"
  src="https://player.chillipopup.com/javascript/pixel.js?id=YOUR_WORKSPACE_ID"
  data-api="https://api.chillipopup.com"
  async="true"></script>
Two parts matter:
id=YOUR_WORKSPACE_ID— this ties the pixel to your ChilliPopup workspace. It is how the script knows which content to load. You never need to edit it by hand; it is already baked into the code you copy from the dashboard.async="true"— the script loads in the background so it never slows down or blocks your page.
Before you start
You will need two things:
- A ChilliPopup account (the free plan covers up to 1,000 visitors a month, with no credit card required).
- At least one popup or form created and published, so there is something to show once the code is live. If you have not built one yet, do that first in the editor, then come back.
- Access to edit your website's HTML, theme, or a tag manager — anywhere you can add code to the
<head>.
Install ChilliPopup in 3 steps
Copy your install code
Log in to your ChilliPopup dashboard and open the Install screen (also labelled Installation code). Choose Any website, then click Copy next to the code snippet. It is copied to your clipboard with your Workspace ID already inside.
Paste it before the closing </head>
Open your website's HTML and paste the snippet on every page, immediately before the closing
</head> tag. Most websites share one header template across all pages, so you usually
only add it in a single place (a layout file, theme header, or "site-wide head" setting) and it applies
everywhere.
Save and re-publish your site so the change goes live.
Publish your content, then verify
Back in ChilliPopup, make sure the popup or form you want to show is set to Published and enabled. Reload your website and confirm it appears. Once ChilliPopup detects the pixel on your domain, the dashboard shows a green "Installed & live" check on the Install screen.
That's it. From now on, every new popup, form, survey or quiz you publish in this workspace appears automatically — no code changes, no re-deploys. You manage everything from the dashboard.
No-code shortcuts by platform
Prefer not to touch code at all? If your site runs on one of these platforms, use the dedicated guide — each one installs ChilliPopup without editing HTML:
How to check the pixel is working
There are three quick ways to confirm ChilliPopup is installed correctly:
| Check | How | What you should see |
|---|---|---|
| Dashboard status | Open the Install screen after visiting your live site | A green "Installed & live" badge with your domain |
| Your popup shows | Visit your site in a fresh/incognito window and trigger the popup's rule (e.g. wait, scroll, or exit-intent) | The published popup appears on the page |
| Page source | Right-click → View page source and search for chillipopup-pixel |
The <script> tag is present in the HTML |
Troubleshooting: my popup isn't showing
If nothing appears after installing, work through these in order — one of them is almost always the cause:
1. The popup is still a draft
ChilliPopup only serves content with a status of Published. A draft — even an enabled one — is never shown to visitors. Open the popup and publish it.
2. The code isn't on the page you're viewing
Confirm the snippet is actually in the page's HTML (View page source → search for chillipopup-pixel). If your site has multiple templates, make sure the one rendering this page includes the header code.
3. A display rule hasn't been met
Popups fire based on their display rules — a delay, scroll depth, exit intent, specific pages, or visitor targeting. If the rule's condition hasn't happened yet, the popup correctly stays hidden. Check the rule, or set it to show immediately while testing.
4. An ad blocker is hiding it in your browser
Some ad/tracker blockers block third-party scripts. This only affects your browser, not your visitors, but it can make it look broken during testing. Test in an incognito window with extensions disabled.
Caching gotcha: if your site or a CDN caches HTML aggressively, your change to the
<head> may not appear immediately. Clear your site/CDN cache after adding the code, then
re-test.
Where to find your Workspace ID
You rarely need it on its own — it's already inside the copy-paste snippet. But if a plugin or app asks for
just the ID, you'll find it on the Install screen of your dashboard, shown as the
id= value in the code (a string like a1b2c3d4-…). Copy that value.
Frequently asked questions
Do I need one install code per popup?
No. You install a single ChilliPopup code once per website. That one snippet loads every published popup, form, survey and quiz in your workspace. When you create new content or change display rules, nothing needs to be re-installed — the change goes live automatically.
Will the ChilliPopup script slow down my website?
No. The pixel is a single lightweight JavaScript file loaded asynchronously from a fast static host (player.chillipopup.com), so it never blocks your page from rendering. Its network calls are wrapped so that, even if one fails, it never breaks the host page.
Where exactly do I paste the ChilliPopup code?
Inside the <head> of your HTML, just before the closing </head> tag, on every page where you want popups to appear. Most sites have a single template or theme file that controls the head for all pages, so you usually only add it once.
My popup is not showing. What should I check?
The three most common causes are: the popup is still a draft (only Published content is served), the install code is missing on the page you're viewing, or an ad blocker is blocking the script in your own browser. Publish the popup, confirm the snippet is in the page source, and test in an incognito window without extensions.
Do I need a developer to install ChilliPopup?
No. Adding one line of code to your site's <head> is enough. And if you use WordPress, Shopify, Wix or Google Tag Manager, you can install ChilliPopup with no code at all.