A webinar popup invites the visitors already on your website to register for your webinar — one outcome-driven headline, the date and time, a single email field, a button. That's the whole mechanism, and it works because it reaches people at the exact moment they're reading about the topic you're about to teach.
Most teams promote a webinar everywhere except the one place interest is already proven: their own site. They build a landing page, blast the list, post on social — and never ask the blog reader who is, right now, three paragraphs deep into an article about the very thing the webinar covers. This guide fixes that, end to end.
Key Takeaways
- Your site visitors are the warmest webinar audience you have — they chose the topic before you ever pitched the event.
- The registration popup needs four elements: an outcome headline, the date and time, one email field, and a button that claims a seat.
- A countdown timer to the registration deadline plus date-range display rules means the campaign starts, escalates and stops without you touching it.
- Registrants must stop seeing it: turn off "show again after conversion" and cap the frequency for everyone else.
- ChilliPopup collects the registrations; your email or webinar tool sends the confirmations and reminders. Design the workflow around that honestly.
Why your website visitors are the warmest webinar audience
Every registration source sits somewhere on a warmth scale, and your own traffic sits at the top. Someone reading your article about onboarding emails has already told you two things: they care about the topic, and they trust you enough to spend minutes with your writing. A webinar invitation at that moment isn't an interruption — it's the natural next step.
| Where you promote | Who sees it | What it costs | The catch |
|---|---|---|---|
| Email list | People who already opted in | Nothing new | Reaches the same names every time — it fills seats but never grows the room |
| Social posts | Whatever slice of followers the algorithm allows | Time | Interest is diluted; most followers aren't in a webinar mood when they scroll past |
| Paid ads | Cold strangers | Real budget | You pay to explain who you are and why the topic matters, in one crowded impression |
| Your website (popup) | People actively reading about the topic right now | The tool you already run | Only works if you actually ask — a landing page alone just waits to be found |
That last row is the point. A webinar landing page converts the people who find it; a webinar landing page popup brings the invitation to every relevant reader instead of hoping they stumble onto the page. The two work together — the popup either collects the email on the spot or sends its click to the landing page — but the popup is what turns passive traffic into a promotion channel.
The anatomy of a webinar registration popup
A registration popup earns its conversion rate by what it leaves out. Speaker bios, agendas, three-paragraph descriptions, a name field, a company field — all of it costs seats. Four elements do the work:
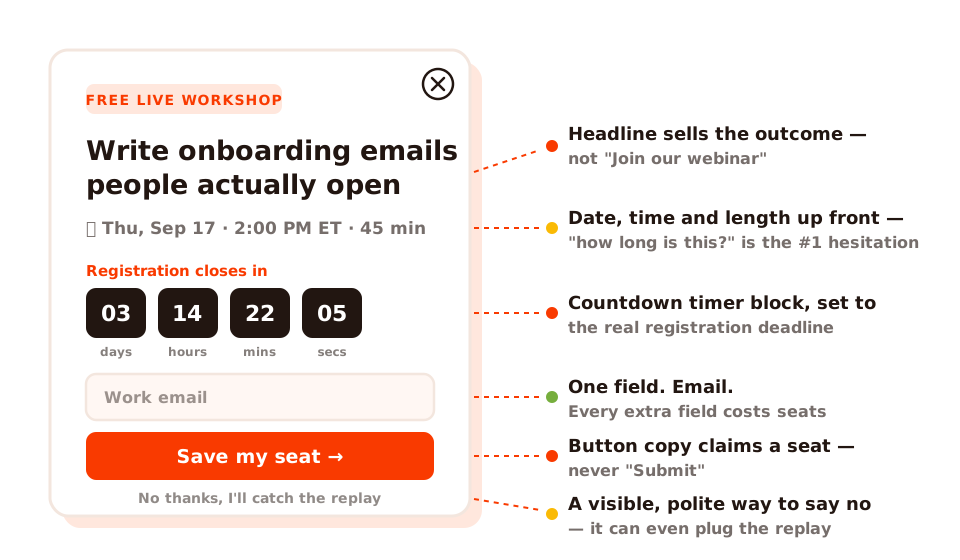
The whole form is one field. Everything else is persuasion.
- Headline = the outcome, not the title. Nobody registers for "Q3 Product Webinar #4". They register for what they'll walk away able to do: "Write onboarding emails people actually open." Our popup copywriting guide goes deeper on outcome-first headlines.
- Date, time and length — up front. "How long is this?" is the biggest silent hesitation, so answer it before it's asked: Thu, Sep 17 · 2:00 PM ET · 45 min.
- One email field. Every additional field filters out real attendees. Collect role or company later — from people who actually showed up.
- Button copy that claims a seat. "Save my seat" frames registration as securing something scarce. "Submit" and "Register" frame it as paperwork.
Add a polite decline link ("No thanks, I'll catch the replay") so closing the popup never feels like the only exit. In the ChilliPopup popup builder, all of this is a text block, an input block and a button block in a drag-and-drop editor — plus one more block that deserves its own section.
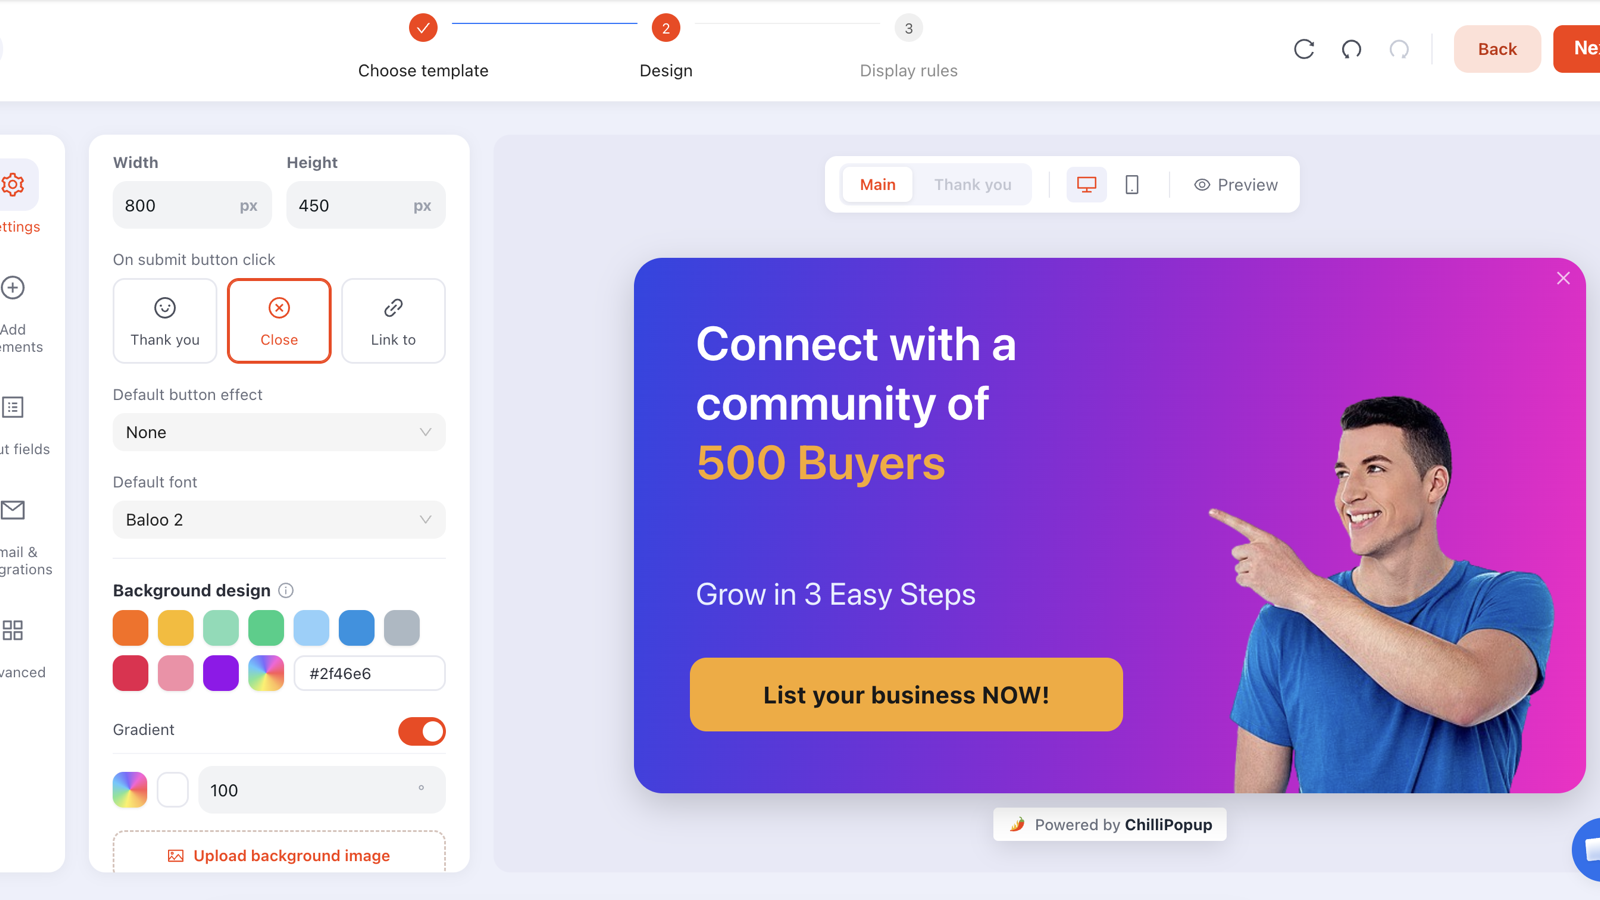
Text, input, button, countdown — the four blocks of a webinar registration popup, arranged in the editor.
Add a countdown timer for the registration deadline
A webinar has something most offers have to fake: a genuinely immovable deadline. The event happens at 2 PM on Thursday whether or not anyone registers, so a countdown on a webinar popup is honest by default — and honest urgency is the only kind that keeps working on returning visitors.
Drop the countdown timer block into the popup and point it at the moment registration actually closes. Two details make it convert:
- Count to the deadline, not vaguely. Label it — "Registration closes in" — so the number means something. A timer with no referent is decoration.
- Close registration slightly before the start. A deadline of 1:00 PM for a 2:00 PM webinar gives you an hour to send joining links to late registrants without scrambling, and it makes the countdown end at a moment you control.
The deadline must be real. If the countdown hits zero and the popup keeps accepting registrations, every returning visitor learns your urgency is theatre — and that lesson transfers to every future campaign you run. The fix is structural, not moral willpower: end the popup at the deadline with a date-range rule, which is exactly what the next section is about. For the general mechanics of target-date timers, see the countdown timer popups guide.
Date-range rules: a campaign that starts and stops itself
Webinar promotion is a scheduling problem wearing a marketing costume. The popup should appear about two weeks before the live date, disappear at the registration deadline, and hand over to a replay popup afterwards — none of it depending on someone remembering to press a button at 1 PM on a Thursday. ChilliPopup's date-range display rule takes a start date and an end date, each with an hour, and simply refuses to show the popup outside that window. Set it once and the whole campaign runs on rails:
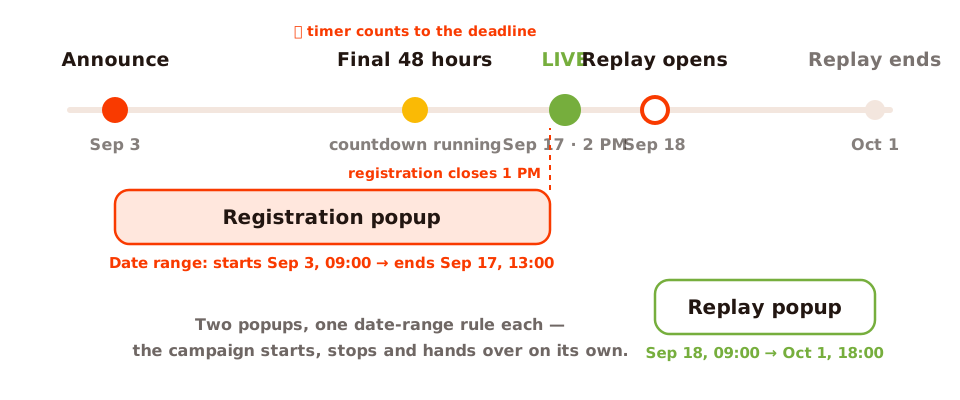
Two popups, one date-range rule each — announce, escalate, stop, hand over.
| Phase | Window | What the visitor sees | The rule doing the work |
|---|---|---|---|
| Announcement | ~2 weeks out → deadline | The registration popup on relevant pages | Start date + hour on the date range |
| Final stretch | Last 48–72 hours | The same popup — the countdown now reads in hours, not days | Nothing; the timer escalates by itself |
| Live day | From the deadline onward | Nothing — the invitation is gone | End date + hour (the registration deadline) |
| Replay | Day after → ~2 weeks later | A second popup offering the recording | The replay popup's own date range |
The hour precision matters more than it looks. Ending "on September 17" is ambiguous — midnight at the start of the day cuts your busiest morning; midnight at the end advertises a webinar that finished hours ago. Ending at Sep 17, 13:00 is exact: the popup dies at the moment the deadline it advertised arrives, which is the countdown's promise kept automatically.
The quiet win: nobody has to remember anything. The most common webinar popup failure — the stale invitation to last Thursday's event — becomes structurally impossible.
Where to show it — and the exit-intent second chance
Page targeting: promote where the topic already lives
A webinar about onboarding emails deserves a popup on your articles about onboarding, email marketing and activation — not on your careers page. Use page targeting with URL rules (contains, starts with, is exactly) to put the invitation where the match between reader and topic is strongest:
- Blog posts on the webinar's topic — the highest-intent surface you own. If you run popups on your blog already, the webinar popup simply replaces the generic newsletter ask on matching posts for two weeks (our blog popup strategy guide covers that trade-off).
- Feature or product pages adjacent to the topic — readers evaluating what your webinar teaches around.
- The homepage, optionally — broader audience, weaker match; consider a longer time delay there so it only reaches engaged visitors.
For the primary trigger on those pages, a time delay of 20–30 seconds or a scroll trigger around 40–50% works well: both select readers who are actually engaging with the topic rather than bouncing.
Exit intent: the second chance
Some readers will close the popup — or never scroll far enough to earn it — and head for the tab bar. Exit intent fires exactly then, when the cursor darts toward closing the page, which makes it the perfect second ask: it costs nothing if they stay, and it's your last word if they go.
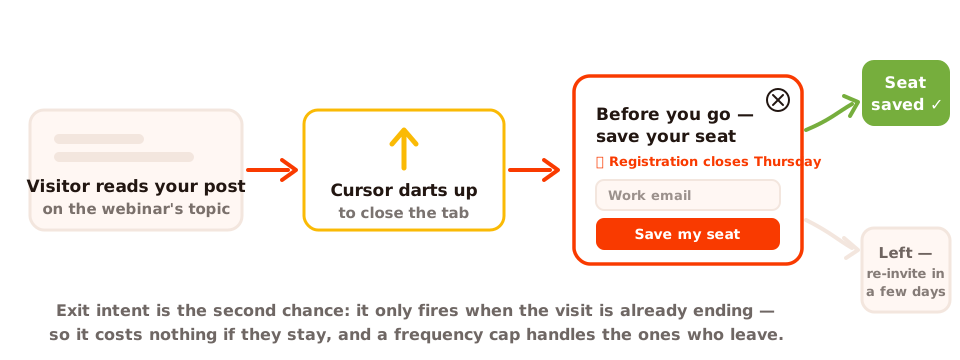
The exit popup only ever fires on a visit that was already ending.
Reframe the exit version rather than repeating the first popup: acknowledge the exit ("Leaving without a seat?") and make the deadline concrete ("Registration closes Thursday at 1 PM"). Two cautions from the exit-intent popups guide apply doubly here: exit intent is unreliable on mobile — use a scroll trigger there — and an exit popup still needs a frequency cap like any other.
Stop showing it to people who already registered
Nothing burns goodwill faster than asking someone to register for a webinar they registered for yesterday. Two switches in the display frequency rules keep the campaign polite:
- Turn off "show again after conversion". Anyone who submits the popup stops seeing it, permanently. For a webinar this isn't optional hygiene — a repeat invitation reads as "we lost your registration", which is precisely the anxiety you don't want in the week before the event.
- Cap the frequency for everyone else. Once every 3–4 days is a sensible rhythm for a two-week campaign: a visitor who declines on Monday gets one fresh look mid-week, when the countdown has visibly moved, instead of a nag on every page view.
The countdown does the escalation for you. The same popup that said "13 days" politely on the first encounter says "26 hours" urgently on the last one — no extra campaign needed, no manual copy change.
Confirmations and reminders: the honest workflow
Let's be precise about who does what, because webinar registrations are a relay race and dropped batons are no-shows. ChilliPopup collects the registrations: every email submitted through the popup lands in your dashboard under that campaign's submissions, timestamped. It does not send emails — no confirmation, no joining link, no day-before reminder. That's your email tool's or your webinar platform's job:
- Export or copy registrants from the dashboard into your webinar platform (which handles its own confirmations and reminders) or into your email tool.
- Do it on a schedule. Daily works for a two-week campaign; on the final day, do it hourly-ish — a registrant from 11 AM needs their joining link before 2 PM.
- Send the confirmation with the joining link after each import, then a reminder the day before and another an hour before. Attendance is won or lost in those reminders, not in the popup.
Write the thank-you screen to match reality. If registrants get their link when you run the evening import, say "Your joining link will land in your inbox today" — not "Check your inbox now". A popup that over-promises by twenty minutes creates support tickets; one that promises exactly what happens creates trust.
After the live date: swap in the replay popup
The webinar ends; the interest doesn't. Everyone who saw the invitation but couldn't make Thursday at 2 PM is still a lead — so the campaign's second act is a replay popup, and it's mostly a duplicate of the first:
- Swap the copy: "Missed the live workshop? The replay is up." The button becomes "Watch the replay →".
- Keep the email field. Gating the replay behind an email keeps the popup a lead-capture tool — you send the replay link from your email tool, exactly like the joining link before it. If the replay is a public YouTube video, you can even embed it in the popup with the YouTube block.
- Give it its own date range: start the morning after the webinar, end about two weeks later. An offer with an edge outperforms one that lingers forever.
- Turn off "show again after conversion" on this one too, so replay watchers aren't re-invited to what they already watched.
The handover is seamless by construction: the registration popup's date range ends at the deadline, the replay popup's begins the next morning, and your site never shows both — or neither by accident.
Worked example: promoting a 45-minute onboarding-emails workshop
Here's the whole campaign for a fictional-but-typical event: a free 45-minute live workshop on writing onboarding emails, running Thursday, September 17 at 2:00 PM ET. Steal the copy and change the nouns.
The registration popup (Sep 3 → Sep 17, 1:00 PM)
- Eyebrow: FREE LIVE WORKSHOP
- Headline: Write onboarding emails people actually open
- Subline: A 45-minute live workshop. Bring your worst-performing email — leave with a rewrite.
- Date line: 📅 Thursday, Sep 17 · 2:00 PM ET · 45 minutes
- Countdown label: Registration closes in — timer set to Sep 17, 1:00 PM
- Field: Work email
- Button: Save my seat →
- Decline link: No thanks, I'll catch the replay
- Thank-you screen: You're in! Your confirmation and joining link will land in your inbox today. See you Thursday.
The exit-intent variant
- Headline: Leaving without a seat?
- Subline: The live workshop is Thursday and registration closes at 1 PM. One email field, 45 minutes, one rewritten onboarding sequence.
- Button: Save my seat →
The replay popup (Sep 18 → Oct 1)
- Headline: Missed the live workshop? The replay is up
- Subline: 45 minutes on onboarding emails that get opened — available until October 1.
- Field: Work email · Button: Watch the replay →
And the build, start to finish:
1. Build the registration popup
Start from the popup template gallery — pick anything with a headline-field-button spine — or describe the popup in a prompt and let the AI generator hand you a draft to edit. Keep the four anatomy elements, cut everything else. If the pixel isn't on your site yet, the one-line install guide comes first; one script serves every campaign in this guide.
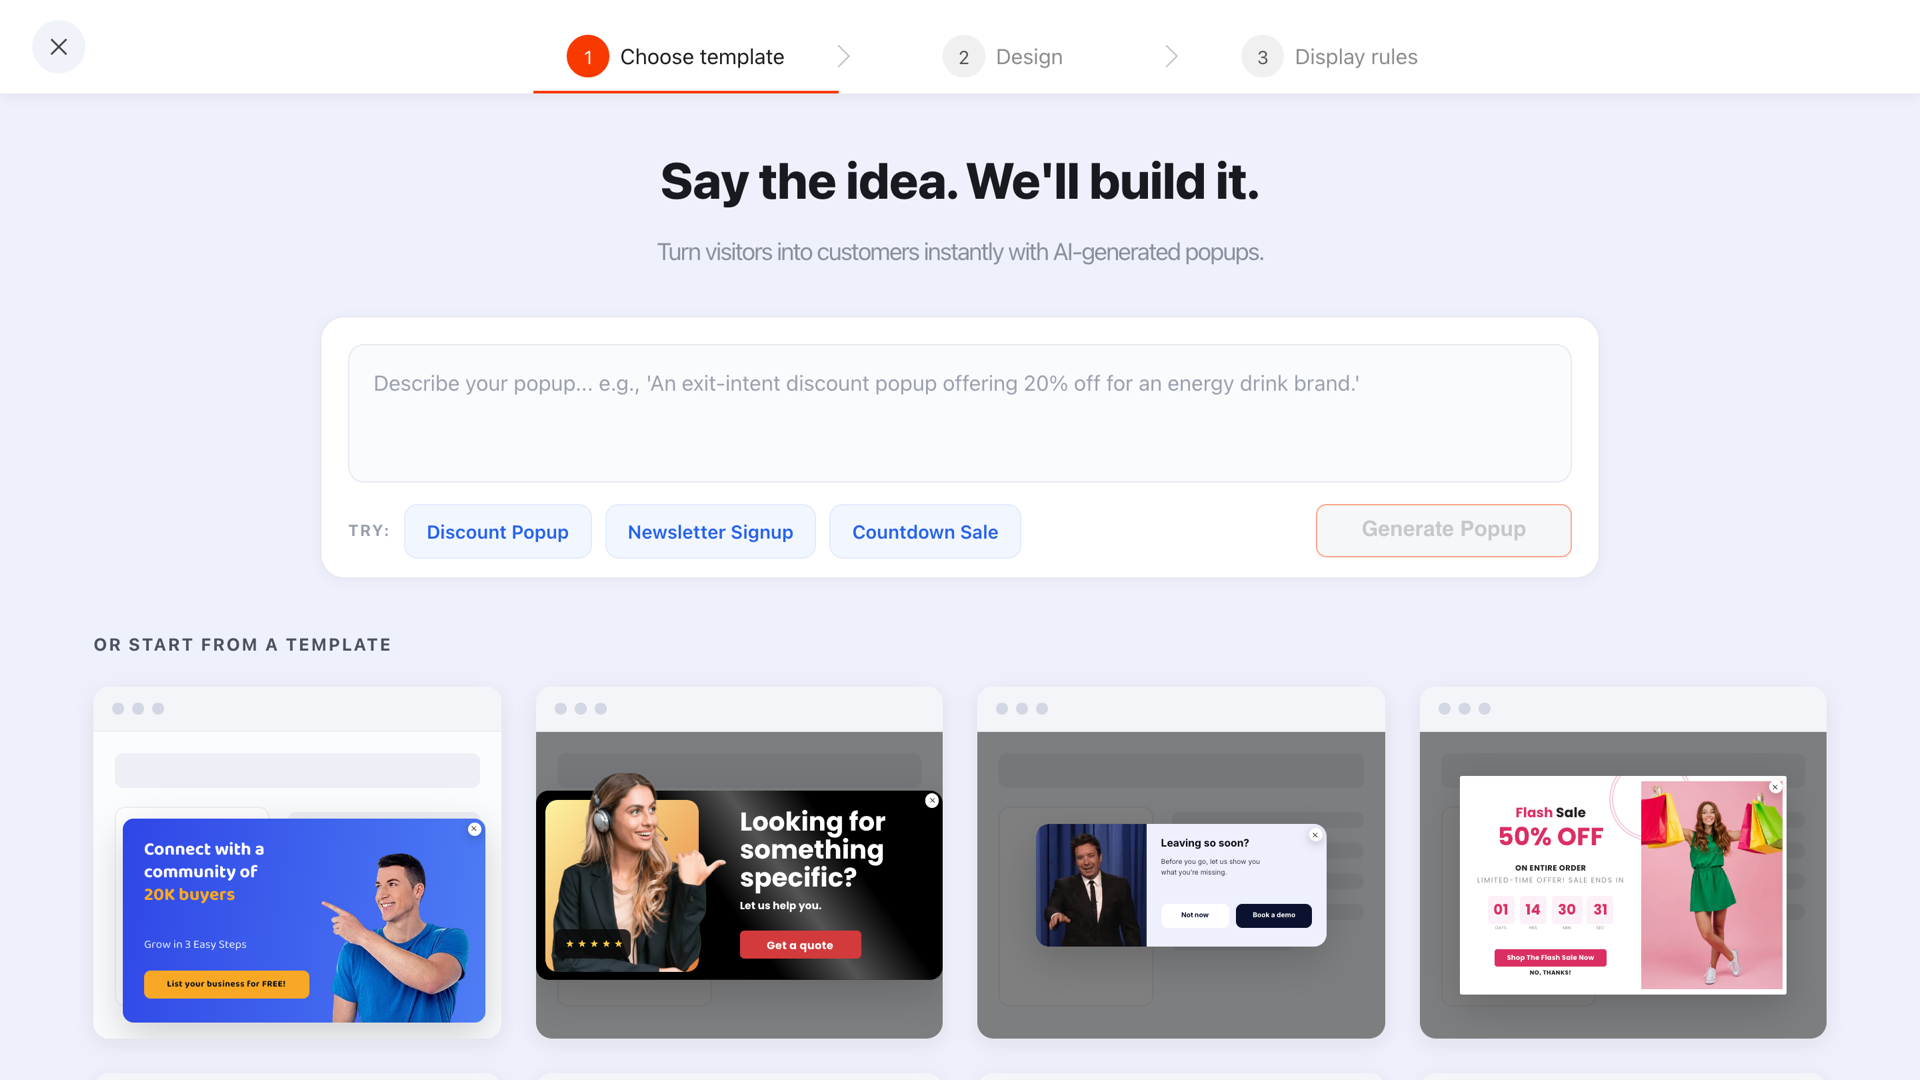
Start from a template with a headline-field-button spine, then swap in the webinar copy.
2. Add the countdown timer
Drop the countdown timer block under the date line and point it at the registration deadline — Sep 17, 1:00 PM in the example. Label it "Registration closes in" so the number has a referent.
3. Set the rules: date range, pages, triggers
Date range: starts Sep 3, 09:00 — ends Sep 17, 13:00. Page targeting: URL contains your onboarding and email-marketing article paths, plus any adjacent feature pages. Trigger: scroll around 40% (works on desktop and mobile), with the exit-intent variant as the desktop second chance.
4. Cap frequency, gate conversions, wire the emails
Frequency: once every 3 days. Turn off "show again after conversion". Then set your calendar, not ChilliPopup's: a daily export of registrants into your email or webinar tool, which sends the confirmation with the joining link, a day-before reminder and an hour-before reminder.
5. Schedule the replay swap
Duplicate the popup, swap in the replay copy, remove the countdown (or point it at October 1 if the replay genuinely comes down), and set its date range to Sep 18, 09:00 — Oct 1, 18:00. Both campaigns now run themselves; your only remaining job is showing up Thursday and being good.
A/B test the incentive — then measure what worked
Once the structure is right, the biggest open question is usually the incentive: is the webinar itself enough, or does a bonus move the needle? ChilliPopup's built-in A/B testing splits traffic between two variants, so you can answer it with data instead of a meeting:
- Variant A: the workshop, straight — "Write onboarding emails people actually open."
- Variant B: the workshop plus a takeaway — "…and get our 12 onboarding email templates when you attend."
Change one thing per test — the incentive, or the headline, or the button copy — and let the deadline end the test naturally. Then read three numbers in the analytics dashboard:
- Views — your reach. Low views with two weeks on the clock means the rules are too narrow: widen the page targeting or shorten the time delay.
- Conversion rate — submissions divided by views: how well the offer and copy work on the people who saw it. This is where the A/B variants separate.
- Submissions — the registration count itself, and the roster you export.
One honest boundary: attendance lives in your webinar tool, not your popup analytics. The popup's job ends at the registration; comparing registrants to actual attendees is analysis you do on the other side of the relay. For reading popup numbers in general, see the popup analytics guide.
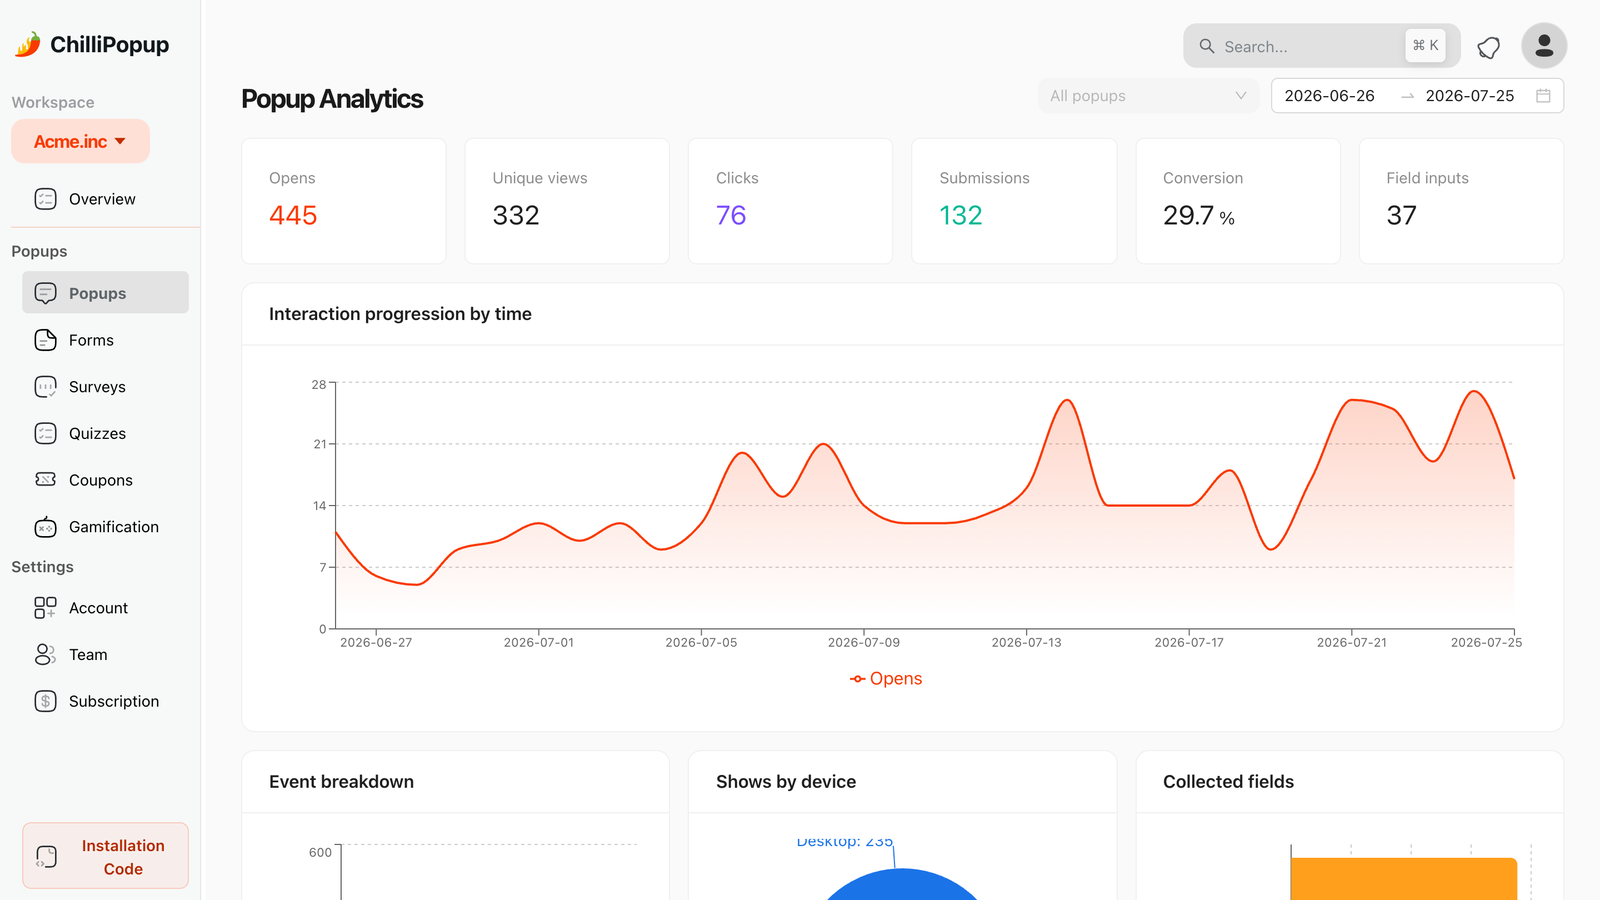
Views tell you if the rules reached anyone; conversion rate tells you if the copy convinced them.
Common webinar popup mistakes
- The headline is the webinar title. "Q3 Growth Webinar" sells nothing. Lead with what the attendee walks away able to do.
- Asking for name, company and phone. Every field beyond email trades real attendees for CRM tidiness. Collect the rest from people who show up.
- A countdown pointing at nothing. An unlabelled timer, or one whose zero-moment changes nothing, teaches visitors your urgency is fake.
- No end date. The classic: it's Monday, the popup is still inviting people to last Thursday's webinar, and every visitor who sees it trusts your site a little less. A date-range end at the deadline makes this impossible.
- Showing it to registrants. "Show again after conversion" left on means the people most invested in your event are the ones being nagged. Turn it off.
- Blasting every page. A webinar popup on your checkout, pricing or support pages interrupts higher-intent journeys with a lower-intent ask. Target the topic's pages.
- Promising reminders nobody sends. If the thank-you screen says "we'll remind you", someone has to actually wire the export and the reminder emails. The popup makes promises; your email tool keeps them.
- Starting too early. A popup that runs for six weeks is furniture by week three. Two weeks of visibility with a moving countdown beats six weeks of wallpaper.
Fill the room from the traffic you already have
Build the registration popup, the countdown and the replay swap in one editor — with date-range rules that run the campaign for you. Free plan, no credit card required. Paid plans from $29/month.
Start free →Related reading
Frequently asked questions
What is a webinar popup?
A webinar popup is a small overlay on your own website that invites visitors to register for an upcoming webinar — an outcome headline, the date and time, one email field and a button. It promotes the webinar to people who are already reading about the topic on your site, which makes them far warmer than any cold audience you could pay to reach.
When should I start showing a webinar registration popup?
One to two weeks before the live date works for most webinars. Much earlier and the date feels too distant to commit to, while the popup slowly fatigues your regular visitors. Set the popup's start and end with a date-range display rule — start date and hour, end date and hour — so the campaign begins and stops on its own.
What should a webinar registration popup say?
Lead with the outcome, not the webinar title — what will the attendee be able to do afterwards. Then the date, time and length, one email field, and a button written as claiming a seat, like 'Save my seat'. Add a countdown timer pointing at the registration deadline and a polite decline link. Everything else — speaker bios, agendas, five extra fields — costs registrations.
Does ChilliPopup send the webinar confirmation and reminder emails?
No. ChilliPopup collects registrations in your dashboard; it does not send emails. You copy or export the registrants into your email tool or webinar platform, and that tool sends the confirmation, the joining link and the reminders. Write the popup's thank-you screen to promise exactly what your tools actually deliver.
How do I stop the popup from showing after the webinar is over?
Give the popup an end date and hour with a date-range display rule — usually the registration deadline. When that moment passes, the popup stops on its own, so nobody has to remember to unpublish it and no visitor ever sees an invitation to a webinar that already happened. To keep converting afterwards, launch a second popup for the replay with its own date range.
Should webinar popups use exit intent?
Yes — as a second chance, not the only chance. Run the main registration popup on a time delay or scroll trigger on pages about the webinar's topic, and use exit intent to catch readers leaving without registering. Reframe the exit version around the deadline, and remember exit intent is unreliable on mobile, where a scroll trigger works better.