To add a popup to a Webflow site, paste one script tag into Project Settings → Custom Code → Head Code and publish. That is the whole install. Everything after it — the design, the trigger, which pages it appears on, how often — happens outside the Designer, so you never touch your Webflow project again.
Webflow can also build a modal natively, and for some jobs it should. This guide covers both: when the Designer is the right tool, when it isn't, and how to wire up a proper popup on a Webflow site including CMS collection pages and Webflow Ecommerce.
Key Takeaways
- One tag, site-wide. Project Settings → Custom Code → Head Code, then publish. Never per-page.
- Custom code needs a paid Webflow Site plan and only reaches the live HTML when you publish.
- Webflow's native modal is on-click only. No exit intent, no frequency cap, no conversion reporting.
- Target CMS collections by slug prefix — starts with
/blog/beats maintaining page-level code. - Test on the published URL, not the Designer preview — custom code does not run there.
Webflow's native modal vs a popup tool
Webflow genuinely can make a modal: draw a div, set it to display: none, and use an
Interaction to reveal it. If what you need is "click this button, show this panel", stop reading
— the Designer is the right tool and you should build it there.
The gap opens the moment the popup has to appear on its own initiative. A marketing popup is mostly a set of rules about when and to whom, and none of those rules exist in the Designer.
| What you need | Webflow Designer | A popup tool |
|---|---|---|
| Open on click of a button | Yes — use an Interaction | Yes |
| Open on scroll depth or a delay | Possible with Interactions, per page | Yes, as a setting |
| Exit intent | No | Yes |
| Show once a week, not every page view | No | Yes — display frequency |
| Stop showing after someone converts | No | Yes — one switch |
| New vs returning visitors | No | Yes |
| Views, conversion rate, collected values | No | Yes, per campaign |
| Change the offer without republishing the site | No — every edit is a republish | Yes |
The practical split. Use Webflow Interactions for UI modals that belong to the page — a video lightbox, a size guide, a "book a call" panel. Use a popup tool for anything that is a campaign: signups, discounts, cart recovery, surveys. The second kind changes weekly, and you do not want a site republish in that loop.
Step 1 — Paste the script into Webflow's head code
In Webflow, open Project Settings, choose the Custom Code tab, and paste the snippet into the Head Code field. Save your changes.
<script id="chillipopup-pixel"
  src="https://player.chillipopup.com/javascript/pixel.js?id=YOUR_WORKSPACE_ID"
  data-api="https://api.chillipopup.com"
  async="true"></script>
Replace YOUR_WORKSPACE_ID with the ID from your dashboard's install screen — or
just copy the whole line from there, where it is already filled in. The
install guide
shows exactly where to find it.
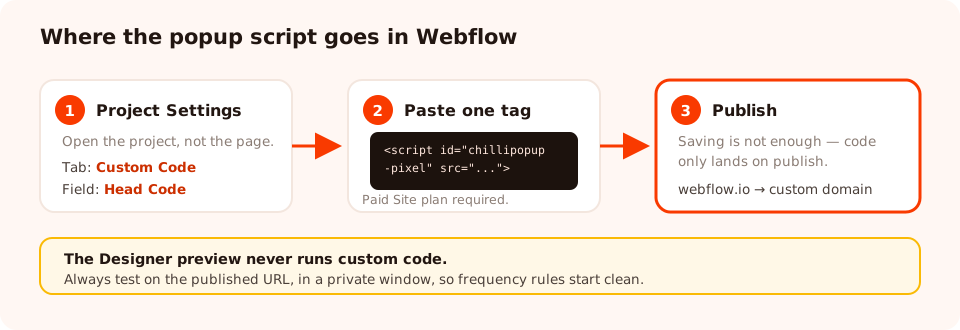
Three clicks and a publish. Page-level custom code exists too, but the pixel belongs site-wide.
Two Webflow-specific gotchas. Custom code in Project Settings is a feature of Webflow's paid Site plans, so a free project can't publish it. And code you paste is only written into the live HTML when you publish — saving the setting is not enough, and the Designer preview will never show your popup.
Why site-wide beats page-level
Webflow also lets you add code inside a single page's <head>. Resist it. The pixel
is not what decides where popups appear — the campaign's page-targeting rules are. Install once
site-wide and you can launch a popup on any page later without opening the Designer. Install per page
and every new campaign becomes a Webflow edit and a republish.
Step 2 — Build the popup
With the script live, everything else happens in the popup editor: drag blocks onto a canvas, restyle them, and publish. Blocks include text, buttons, input fields, images, shapes, icons, a countdown timer, a coupon code and a YouTube embed — so most Webflow-site popups need no custom design work at all.
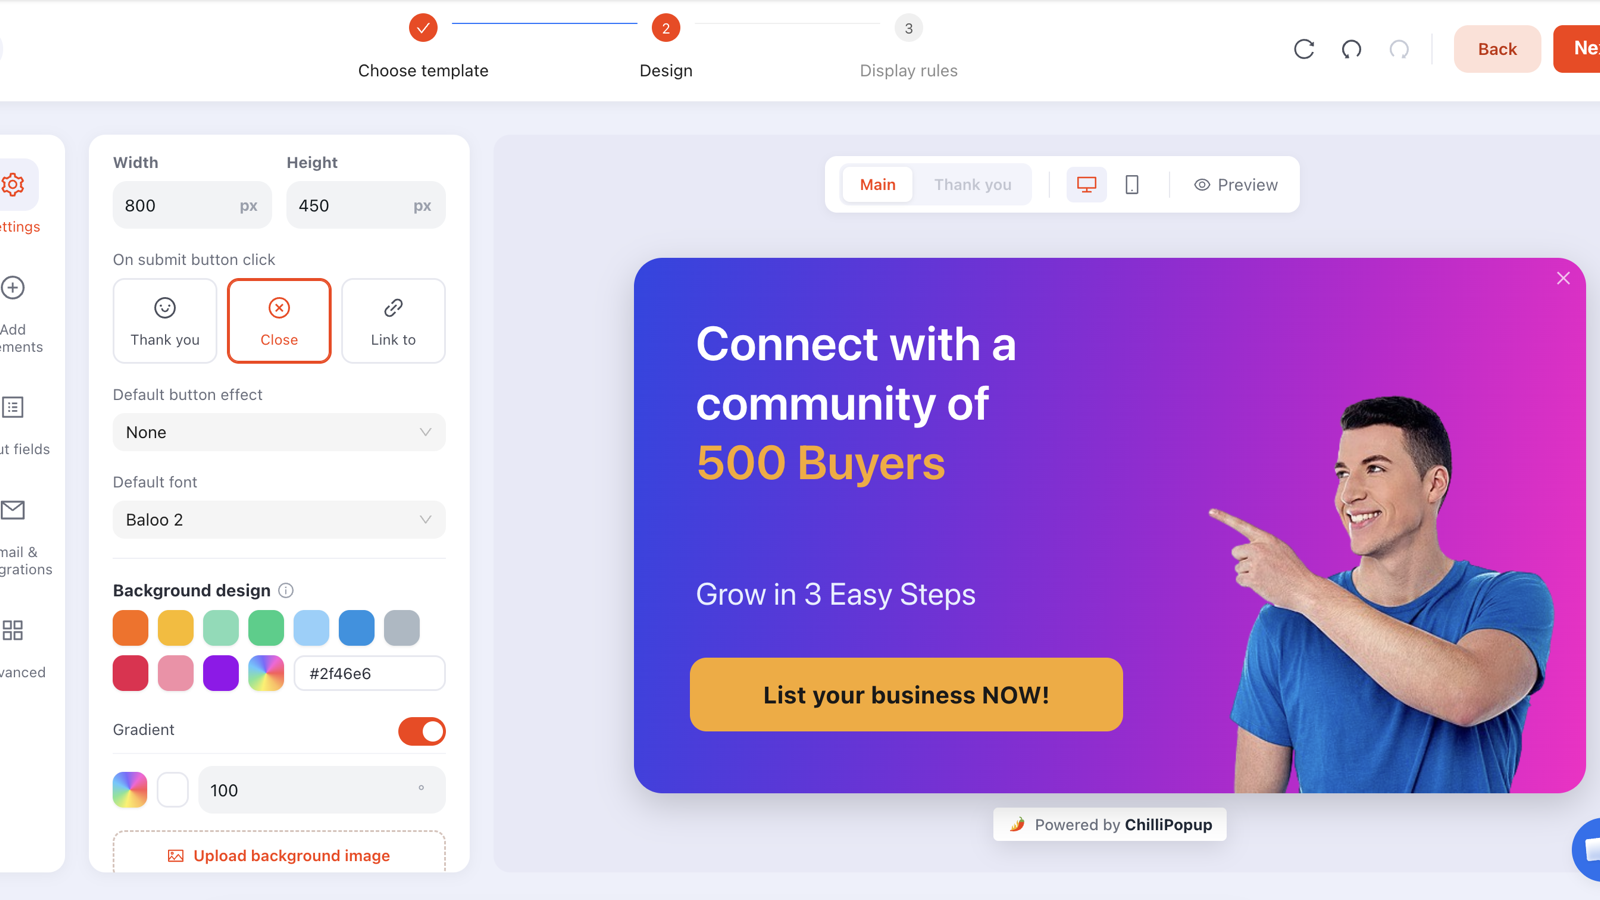
The popup is built outside Webflow, so changing the offer never means republishing the site.
Match your Webflow brand while you are here: set the popup's font from the font catalogue (or upload the same custom font your Webflow project uses), reuse your brand colours on the button, and keep the corner radius consistent with your site's cards. A popup that looks like a different website converts worse, whatever it says.
What about Webflow forms?
Webflow's native form element posts to Webflow's own form submissions and works fine for contact pages. A popup form is a different thing: it stores its submissions with the campaign, reports a conversion rate, and can be reused across pages without redrawing it. If you want capture inside the page rather than over it, an embedded form drops into a Webflow Embed element and behaves like part of the layout.
Step 3 — Target the right Webflow pages
This is where Webflow sites reward a little thought, because CMS collections generate pages you never listed by hand. URL rules handle that: contains, does not contain, is exactly, is not, starts with and ends with.
| Webflow page type | Typical slug | Rule to use |
|---|---|---|
| Homepage only | / | URL is exactly / |
| Every CMS blog post | /blog/<slug> | URL starts with /blog/ |
| Every Ecommerce product | /product/<slug> | URL starts with /product/ |
| One category collection | /category/lighting | URL contains /category/lighting |
| Everywhere except checkout | /checkout | URL does not contain /checkout |
| Thank-you page after an order | /order-confirmation | URL contains /order-confirmation |
Then set the behaviour rules that Webflow cannot: a trigger (exit intent on desktop, scroll on mobile), an audience (new or returning visitors), a frequency so a dismissal is respected, and — the one everybody forgets — turn off "show again after conversion" so subscribers stop meeting the signup popup. The targeting rules guide covers each one in detail.
Add a popup to your Webflow site today
Build popups, forms, surveys, quizzes and games from one editor — and one script tag. Free plan, no credit card required. Paid plans from $29/month.
Start free →Three popups worth running on a Webflow site
1. The blog-to-list capture
Webflow sites are disproportionately content sites, and CMS blog posts are the best-converting popup
real estate you own. Trigger at 50% scroll, target URL starts with /blog/, ask
for an email only, and name the reward: "One practical idea every Tuesday. Nothing else."
2. The exit-intent offer on product pages
For Webflow Ecommerce, target URL starts with /product/, trigger on exit intent
for desktop and inactivity for mobile, and offer something concrete — free shipping over a
threshold usually beats a percentage, because it does not train people to wait for discounts.
3. The one-question exit survey on pricing
On a SaaS or services Webflow site, put a one-question survey on the pricing page with an exit-intent trigger: "Before you go — what stopped you today?" with four options. It is the cheapest customer research a Webflow site can run, and the answers usually rewrite the page.
Common Webflow popup problems
| Symptom | Usual cause | Fix |
|---|---|---|
| Nothing appears at all | The site was saved but not published | Publish the Webflow site — custom code only lands on publish |
| Works on staging, not the live domain | Published to webflow.io only | Publish to the custom domain as well |
| Nothing in the Designer preview | Expected — the preview does not run custom code | Test the published URL in a private window |
| Appeared once, never again | The frequency rule is doing its job | Use a private window, or reset the campaign's seen state |
| Fires on the wrong pages | A contains rule matching more slugs than you thought | Switch to starts with, or add a does not contain exclusion |
| Popup shows but no conversions | Campaign is published; the offer is not believed | Rewrite the headline as a reward and cut to one field |
| Script tag missing from the page source | Free Site plan, or pasted into the footer field | Check the plan, and use Head Code specifically |
A quick sanity check that resolves most of these: open the published page, view source, and search for
chillipopup-pixel. If it is not there, the problem is the Webflow install. If it is there,
the problem is a campaign rule.
Add your popup to Webflow, step by step
1. Copy the snippet
Grab the one-line script from your dashboard's install screen — your Workspace ID is already in it.
2. Paste it into Project Settings → Custom Code → Head Code
Site-wide, not page-level. Save the changes.
3. Publish the Webflow site
Staging first, then the custom domain. Nothing works until you publish.
4. Build and publish the popup
Design it, set the trigger, and switch its status to published — drafts never serve.
5. Point it at the right Webflow slugs
Starts with /blog/ for the CMS collection, /product/ for Ecommerce, is exactly / for home.
6. Test the published URL in a private window
Meet the trigger, submit once, and check the view and submission land in analytics.
Related reading
Frequently asked questions
How do I add a popup to a Webflow site?
Paste one script tag into Project Settings → Custom Code → Head Code and publish the site. After that every popup, form, survey and quiz you build appears on your Webflow pages without touching the Designer again. Custom code in Project Settings is a paid Site plan feature in Webflow, so check your plan first.
Can I build a popup in Webflow without any code?
Yes — Webflow's Designer can build a modal out of a hidden div plus an Interaction, and that is genuinely code-free. What it does not give you is exit intent, frequency capping, new-versus-returning targeting or conversion reporting, so most teams use the Designer for on-click modals and a popup tool for anything triggered by behaviour.
Where does custom code go in Webflow?
Site-wide code goes in Project Settings → Custom Code → Head Code. Page-specific code goes in that page's settings, under Custom Code → Inside <head> tag. For a popup pixel always use the site-wide field — you want it on every page, and the targeting rules decide where popups actually appear.
Do I have to republish Webflow after adding the script?
Yes. Custom code is only written into the published HTML when you hit Publish, so the Designer preview and an unpublished site will not show the popup. Publish to your webflow.io staging domain to test, then to the custom domain.
Will a popup slow down my Webflow site?
The script loads asynchronously, so it never blocks rendering or delays your Webflow page's paint. The popup itself is drawn straight into the page rather than in an iframe, so there is no second document to load.
Can I target specific Webflow CMS pages?
Yes, with URL rules. Webflow CMS collection pages all share a slug prefix, so a rule like URL starts with /blog/ or URL contains /product/ covers a whole collection without listing each item. That is far more maintainable than adding page-level code to every CMS template.